

Modern smart TVs look gorgeous—sleek screens, minimalist bezels, a true work of living-room art. But there’s a catch that gets a lot of people sweating: all that beauty doesn’t matter if you can’t get the thing to stand up. Picking your new screen up from the box and realizing you still have to connect the stand can feel like one of those moments when you start a recipe and realize you’re missing half the ingredients. TV stands aren’t universal, and if you set it up wrong, your brand-new TV could end up in pieces before you even find the remote. The setup can look intimidating with all the cables, screws, and oddly-shaped brackets. But with a little patience and know-how, it’s totally doable—no need to call for backup or break a sweat.
What’s in the Box? Understanding Your Smart TV Stand Parts
Opening up a TV box feels like Christmas—until you see a jumble of foam, bags of screws, and plastic pieces that don’t match anything you own. Most smart TVs ship with everything you need to attach the stand, but here’s the twist: manufacturers use different stand designs even in the same brand. You’ll spot variations: some TVs have central pedestal stands that look like a heavy boot, while others use two feet shaped like boomerangs. The style usually depends on the TV’s width and weight. The screws included are not ornamental—using the wrong length or thickness can damage the panel, or worse, keep the stand loose. Check for a hardware package labeled with a code, sometimes tucked into the bottom foam blocks. In almost every box, you’ll also find a quick-start guide, but in tiny typeface worthy of prescription medicine. Take a quick look at the illustrations—don’t count on actual words guiding you through, as most guides rely more on pictograms than explanations. That’s why many people end up searching online before grabbing a screwdriver.
Some surprises can catch you off guard. For instance, certain models from brands like Samsung or LG require a Phillips head screwdriver you have to supply yourself, while others include a small tool in the pack. Sony, interestingly, sometimes uses uniquely shaped screws, which are nearly impossible to buy at a hardware store if you lose them. While opening, double-check for plastic film covering sensitive pieces—leave these on until you’re done to prevent scuffing your shiny new screen. And don’t toss the packaging right away; manufacturers sometimes stash paperwork or accessory kits inside hidden compartments. Feel around the foam before tossing it all in the recycling bin.
Another tip: be careful with the legs or pedestal. They may look sturdy, but the connectors (the bits that hammer into the TV) are often made from thin metal or hard plastic, and they’re designed for a snug fit, not brute force. If something feels off, stop and double-check the orientation and label on the parts. Right and left legs can look nearly identical but will only fit one way. Trust the stickers and matching shapes—they’re there to steer you right.
TVs in 2025 are lighter overall than models from a decade ago, thanks to advances in LED and OLED tech and thinner materials. But despite their slim figure, the stands must be precisely attached to prevent the set from toppling or vibrating. Manufacturers now engineer stands to distribute weight across a wide footprint, so setups might seem low-slung or wider apart than expected. This deliberate design is meant to stabilize those huge 65-inch or 75-inch screens without taking up as much room as old boxy TVs. Point is—don’t get alarmed if it looks different from what you remember.
Long story short: take inventory of all included stand parts the moment you open the package, and compare to the diagram in the manual. If something is missing, get in touch with customer support before you get too far. Skipping this step leads to headaches, trust me.
Easy Steps for Safely Assembling and Attaching the Stand
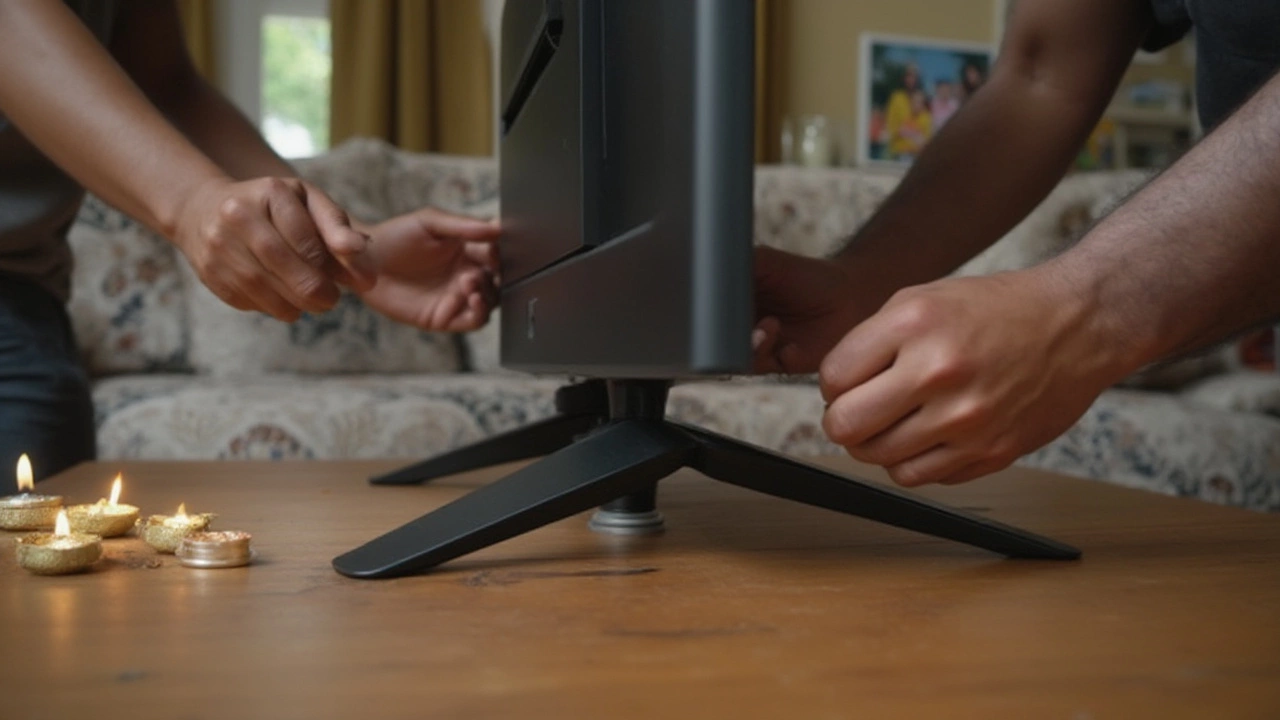
The heart-stopping fear of dropping a brand-new TV is real. The trick is to work on a flat, soft surface—think a big bed, carpet, or pile of thick towels. Never assemble your smart TV stand on hardwood or a slippery table; you’re just tempting fate. Lay the TV face-down (with the screen on the soft surface), making sure there’s plenty of space and you aren’t working near pets or kids who could bump the panel. Pro tip: have a buddy help if the screen is larger than 50 inches. Even if the TV is light, it’s hard to line up parts with just two hands and all those fragile edges can be nerve-wracking.
Here’s how to get the stand on your smart TV without breaking a sweat:
- Unpack and organize all legs, screws, and tools according to the little guide from the box. Check labeling—left and right legs are sometimes different.
- Position the TV face-down on a soft surface. Do not press the screen—apply gentle, even pressure to the bezel or the rear housing only.
- Identify the stand attachment points. They’re usually at the bottom corners or the center of the TV. Some models have plastic covers snapping over the holes; gently pop these off if you need to.
- Line up one leg or pedestal at a time. Don’t force anything—parts should line up snugly and fit flush with the TV case. Watch for arrows or markings indicating the proper direction.
- Hand-tighten the included screws before grabbing your screwdriver. Don’t over-tighten—just enough to hold the leg in place.
- Repeat with the other leg or part. Double-check that each side looks even and feels solid before moving.
- Go over all screws with a screwdriver, making sure everything is tight but not stripped. If the screw meets strong resistance before the leg is flush, the leg might be on the wrong side or facing the wrong way.
- Stand the TV upright (it helps if someone else holds the screen). Test for wobble—an attached stand should feel solid, but it’s normal for very large TVs to have a tiny bit of give.
- Remove the protective film only now, so you avoid scratching the frame or display.
If something isn’t fitting or feels loose, stop and double-check the model and stand type. Sometimes, people try to use legacy stands or mismatch feet meant for a completely different set—it just won’t work, plus you risk damaging the threads and voiding the warranty. Today’s smart TVs are surprisingly delicate behind that glossy surface, especially the ultra-thin OLED panels. It’s not just unsightly to strip a screw; it can also cause micro-cracks or invisible stress points that come back to bite when you least expect it. Some models have an audible latch so you’ll hear a click when the stand is properly inserted. If your TV doesn’t, it’s all about feel—secure, just tight enough.
One overlooked detail: some stands include cable management channels. This lets you tuck HDMI, power, and audio cords neatly behind the feet—a thoughtful perk if your living room is all about clean lines. Make sure to thread your cables before moving the TV to its final position so you don’t need to tip the set later. Also, wipe your fingerprints off the frame with a non-abrasive cloth before enjoying your handiwork. You’d be surprised how visible smudges look once the screen powers on in high definition.
A lot of people worry about voiding the warranty while attaching the stand, but rest easy—manufacturers expect you to do this at home. The only thing that’ll cause issues is using the wrong screws or breaking plastic clips by force. If you hit a snag, look up a specific instruction video for your brand and model; many manufacturers have detailed, free guides for each model on their sites.
Common Pitfalls and How to Avoid Them
When you’re wrangling a techy new TV, sometimes your biggest enemy is overconfidence. The number one mistake? Rushing the job—forcing screws or stands, ignoring the orientation, or skipping the manual entirely. A classic slip: screwing the legs on backwards. This doesn’t just make your TV look goofy; it can mess up the weight distribution, making the set far more likely to tip over if nudged. Want another fun fact? The Consumer Product Safety Commission has warned about TV tip-overs for years, especially in homes with small kids or pets. So wobble isn’t just annoying, it’s a real safety issue.
Another stumbling block is missing hardware. TV packaging isn’t exactly legendary for clarity—little screws can hide deep in the foam or fall out onto the floor. Always count everything before you start. If a screw goes missing, don’t substitute random hardware; the right length and threading prevents you from stripping the insert or damaging the frame.
Here’s a curveball: be extra careful if you’re assembling on a slippery table or if your surface isn’t level. Leaning the TV at an odd angle even for a second can warp parts or induce enough stress to cause internal cracks—especially true for those edge-to-edge OLED displays. Work where you have good light, steady hands, and enough elbow room to stand up without knocking into something.
Then there’s the temptation to skip cable management until the last minute. Big mistake. Once your TV is upright, reaching behind it to run cables—especially if the ports face straight down (looking at you, Samsung)—can be a royal pain. Use the stand’s cable channels from the start, and try to plug in at least power and HDMI before moving the set to its final home.
A less obvious gotcha is using an improper cleaning method on the screen while assembling. Most dumb moves happen when people try to wipe dusty screens with paper towels or glass cleaner—big no-no! Use only microfiber cloths and, if needed, a dab of screen-safe cleaner. Anything else can scratch or leave residue that’s impossible to ignore later.
Also, double-check your surface doorways and furniture spacing before moving the assembled TV. Don’t risk wedging the set between a wall and the entertainment cabinet—measure twice, move once. Modern TV boxes are slimmer, but a bit taller, thanks to manufacturers trying to keep everything protected. Getting stuck mid-lift is more common than you might think.
If after all your best efforts the stand is still unstable, don’t risk it. Many major TV brands now offer wall-mount kits with extra safety cables or feet. For extra-large screens, or if you live in an earthquake-heavy zone, a secondary anchor system isn’t overkill—peace of mind is worth a couple of extra screws in the wall or a quick chat with your local hardware store. Secure furniture and stable TVs make for a much more relaxing binge-watching session.
Tips for the Perfect Setup: Looks, Safety, and Hidden Perks
A stand isn’t just about holding the TV upright—it literally sets the style for the entire viewing space. Today’s smart TV stands are designed to look good and serve function. Some are barely visible, putting all the focus on the panel, while others have a statement design, often in brushed metal or with creative shapes. Pick a spot for your TV where the stand looks intentional—centered on furniture, with space around the base so it doesn’t feel crowded. The golden rule is to keep your eyes at about one-third of the way up the screen when seated for the most comfortable watching, which is why stand height makes such a difference.
Cable management might sound boring, but a tidy setup makes a world of difference. Those notches and channels on modern stands aren’t there just for show. Tuck your cords as you assemble, feeding power, HDMI, and network cables through designated paths to avoid visible clutter once the TV is powered on. Bonus: this protects the cables from pinching, kinking, and accidental unplugging if you end up moving the screen for cleaning.
Another tip: if you’re setting up a smart TV in a bright room, place the stand and screen so strong sunlight doesn’t hit the display directly. Not only does this wreck image quality with glare, it can heat up the panel—never a good idea for modern electronics. If you have kids or pets, consider a slip-resistant pad or bracket under the base to guard against tip-overs. You can also find adhesive stabilizer pads that grip the entertainment center, which takes about two seconds to add but can save a disaster later.
Some smart TVs now offer stand options that change height or angle—especially helpful for those with soundbars or who want to adjust viewing based on where you sit. If you haven’t bought a TV yet, look at models with this flexibility—it’s a small detail that makes life easier. For folks who love a clean look, certain premium models have stands with built-in cable covers or magnetic panels that snap on for a seamless appearance. Don’t ignore these perks; they preserve the high-tech feel even after you’re done setting up.
Want to get fancy? Integrating your TV setup with smart lighting or voice assistants is increasingly common. Some stands hide ports for IR blasters or even integrate with smart homes, letting you control the TV, lights, and speakers as one. Spend a little time running all the cables and planning your layout now and you’ll be able to show off to guests without a pile of wires showing underneath your TV. It’s satisfying to see your handiwork pay off every time you sit down to stream your favorite show.
Finally, take pride in your work! Once the TV stand is installed and everything’s squared away, snap a photo. If you spent time managing cables, aligning legs, and getting the height just right, you’ve done better than half the people who rushed the job. There’s an odd satisfaction in knowing your DIY skills have given your new smart TV stand a secure, stylish home. Next time you shop, you’ll know exactly what to look for—and all your friends will be calling you to set up theirs too.